


This blog comprises the most used Git commands that every developer must know.
- To Initialise a repository: Creates an empty repository
git init
- To view the changes done in the project: This command displays tracked, untracked and changes done in the project which right now don't exist in the project history.
git status
- To permanently store the changes in the history of the project:
- To stage all files / selected files:
git add . || git add index.html, pic.jpg
- To unstage a file before committing:
git restore --staged index.html
- To commit the changes:
git commit -m "picture added"
It shows the number of files changed, lines inserted and deleted.
- To view the history of the project:
git log
- To remove a commit (or) go back to the previous working version of the project:
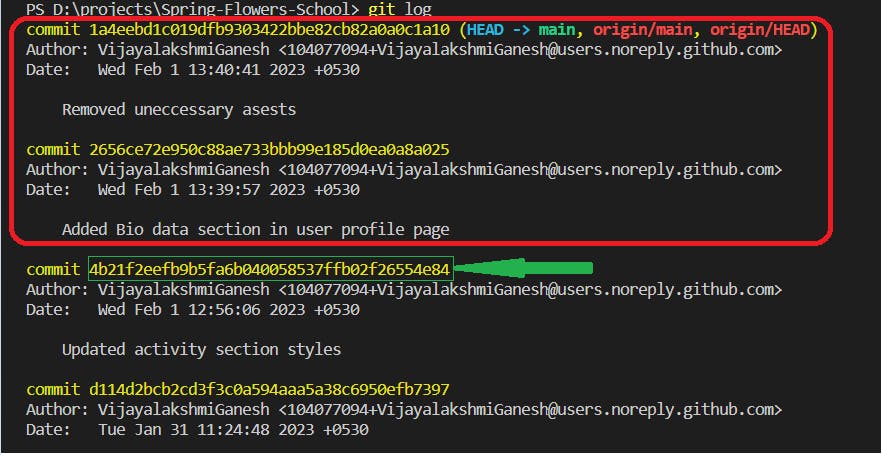
To remove the latest two commits, copy the commit ID of the previous commit (the version of the project we want) and enter the following command
git reset 4b21f2eefb9b5fa6b040058537ffb02f26554e84
the latest two commits that we want to remove will now be not present in the project history.
- To stash the changes: the changes will be temporarily removed from the files and can be used later in case we want to restore or discard them.
git stash
- To bring back or restore the changes from the stash:
git stash pop
- To discard the changes in the stash:
git stash clear
- To connect the remote repository to the local repository:
git remote add origin https://github.com/VijayalakshmiGanesh/practice-git.git
- To transfer commits from the local repo to the remote repo of the "main" branch:
git push origin main
- To create a new branch "feature1":
git branch feature1
- To switch and commit/push the code in the newly created branch:
git checkout feature1
Now, the head is pointing to feature1 and the new commits will be done in the feature1 branch.
Why different branches are needed:
You are working on a complex feature that might have some bugs and the code is not finalized. When you push this code directly to the main(default) branch, it might affect the existing functionalities or the prod might get crashed. Therefore, all the codes that are not finalized yet should go on a separate branch so that the users are not affected. It is suggested that you create a new separate branch for each feature/bug that you are working on. So that you can create a new Pull request for every feature/bug. You can create only one PR for a branch.
- To merge the feature1 branch code to the main branch:
git merge feature1
The code you worked on in the feature1 branch is now finalized. So we are merging the feature1 branch code with the main branch.
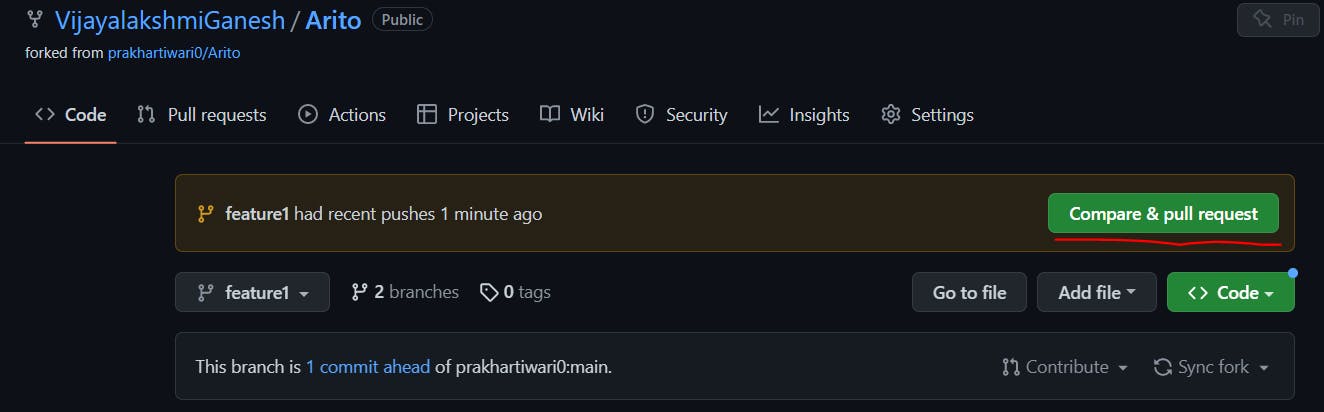
- To work on an existing repo or do a contribution to someone else's repo:
- Fork a repo:


- Clone a repo:
git clone https://github.com/VijayalakshmiGanesh/Arito.git
- To sync changes you make in the forked repo with the original repo:
Upstream URL is the original repo (URL of the repo that you forked or you want to contribute to)
git remote add upstream https://github.com/prakhartiwari0/Arito.git
- To merge your changes done in the forked repo with the original repo, you need to create Pull Request.
1. Create a feature branch and checkout.
2. Commit and push your changes to the feature branch.
3. Create a Pull Request from the feature branch of your forked repo to the main branch of the original repo.

- To remove a commit from Pull Request: Follow step 5 (reset and stash) and push by force as your remote repo contains the file which your local repo doesn't.
git push origin feature1 -f
Why forking and cloning are required: In case you want to contribute to the Linux repo, you will not have direct access to manipulate the files of the Linux repo for protection measures. So you fork the Linux repo to your personal GitHub account. Forking creates a copy of the Linux repo in the remote location and allows you to make changes/debug the code without affecting the original repo.
Cloning creates a copy of the repo in your local location to work on the source code. It means downloading the source code files and storing them in your local drive.
If you have the permissions/access to the repository you want to contribute to, you can directly clone the repo and push the changes.
If you do not have the permissions/access to the repository you want to contribute to, then you will need to fork the repo and create a pull request to merge your changes to the original Linux repo.
- To fetch or bring the latest changes of the remote repo to your local repo:
git fetch --all --prune
--all: from all the branches
--prune: the deleted ones
- To reset the code of our forked repo main branch with the code of the original repo main branch: You can either fetch and reset the code or just directly pull.
git reset --hard upstream/main
git push origin main
- To pull the code directly from the main branch of the upstream:
git pull upstream main
git push origin main
Git Fetch tells the local repository that changes are available in the remote repository without actually bringing the changes into the local repository.
Git Pull brings the copy of the remote repository changes into the local repository.
Reference: https://www.geeksforgeeks.org/git-difference-between-git-fetch-and-git-pull/